Making good food at home without breaking your budget
Showing posts with label cake. Show all posts

Monday, May 14, 2018

Chocolate Cinnamon Cake (Quick and Easy)

There are times when you want a quick dessert, but not a large amount.  Maybe just enough for 2, 4, or even 6 people.  This is one of our favorites.  It's just enough for a small family, especially when there are only 2 or 4.  It comes together quick, and you probably have the ingredients in your pantry.

You will need:
2/3 cup baking mix, (such as Bisquick or Jiffy)
1/4 cup sugar
2 Tabs. cocoa
3/4 teaspoon cinnamon
1 egg
1/3 cup milk
1 1/2 Tabs. softened butter
1/2 cup chocolate flavored syrup
Preheat the oven to 350 degrees.

In a small / medium bowl, combine baking mix, sugar, cocoa, and 1/2 teas cinnamon.  Whisk together to remove any lumps in the baking mix and cocoa.
Add in milk, egg, and softened butter.  With a hand mixer on low, mix for 30 seconds, then with the hand mixer on medium mix for 3 minutes.  Be sure to scrape the bowl often.
Pour into an 8 X 4 inch loaf pan that has been sprayed with baking spray.  Bake at 350 degrees for 30 to 35 minutes, until a toothpick inserted in the center comes out clean.
Remove from oven, and allow to cool on a cooling rack for 10 minutes.
Gently remove cake from pan, and allow to cool.
While the cake is cooling, in a small microwaveable bowl combine the chocolate syrup and the remaining 1/4 teas. cinnamon.  Microwave on high for 1 minute.  Remove and stir.
Drizzle the topping over the top of the cake.
Your quick and easy chocolate cinnamon cake is now ready to serve.
The cinnamon adds a nice touch to the chocolate.  My husband likes to add a scoop of vanilla ice cream on top of his cake, which is also very delicious.

So, the next time, you're in a hurry to get a dessert for your dinner - give this chocolate cinnamon cake a try.

Enjoy !!

Monday, December 12, 2016

Blueberry Pudding Cake

My husband loves anything blueberry.  And whenever blueberries are on sale, I stock up, so I always have them in my freezer ready to use in cakes, pies, muffins, and to top yogurt.  Several years ago, I found this recipe for a blueberry cake that was so easy, and my husband just loves it.  It's very easy, and you can easily feed 9 people from this recipe.  Today, I share it with you.
You will need:
2 cups fresh, (or frozen), blueberries
1 teas. ground cinnamon
1 teas. lemon juice
1 cup all purpose flour
1 1/2 cup sugar
1 teas baking powder
1/2 cup milk
3 Tabs. butter, melted
1 Tabs.. cornstarch
1 cup boiling water
Preheat the oven to 350 degrees.
Spray an 8 X 8 inch baking pan with baking spray

In the baking pan toss the blueberries with the cinnamon and lemon juice.  Give it a stir.
In a medium bowl, combine the flour and 3/4 cup of sugar, and baking powder.  Stir well.
Stir in the melted butter and milk.  Stir well.
Spoon batter over the blueberries.
In a small bowl, combine the remaining 3/4 cup sugar and cornstarch.  Stir well.
 Sprinkle over the batter.
Slowly, pour the boiling water over the top.

Bake uncovered, at 350 degrees for 45 to 50 minutes, (or until the cake top tests done).
Allow the cake to cool on a baking rake.
And your pudding cake is ready to serve.  Notice how you have this wonderful luscious blueberry pudding and a light, (not to sweet), cake topping.
The perfect ending to a supper, or a great treat to serve when guest drop by.

Enjoy !

Monday, June 22, 2015

Applesauce Cake


 Since I usually always have apples on hand, I pretty much always have applesauce on hand also.  When my apples start to get a little past their prime, I core them, cut them into quarters, add a little water and cook them until they are just softened.  Drain off the liquid, and puree them.  Instant unsweetened applesauce ready to eat or use in many of my recipes.

One of our favorites, is applesauce cake.  It's quick and can be thrown together in a matter of minutes.
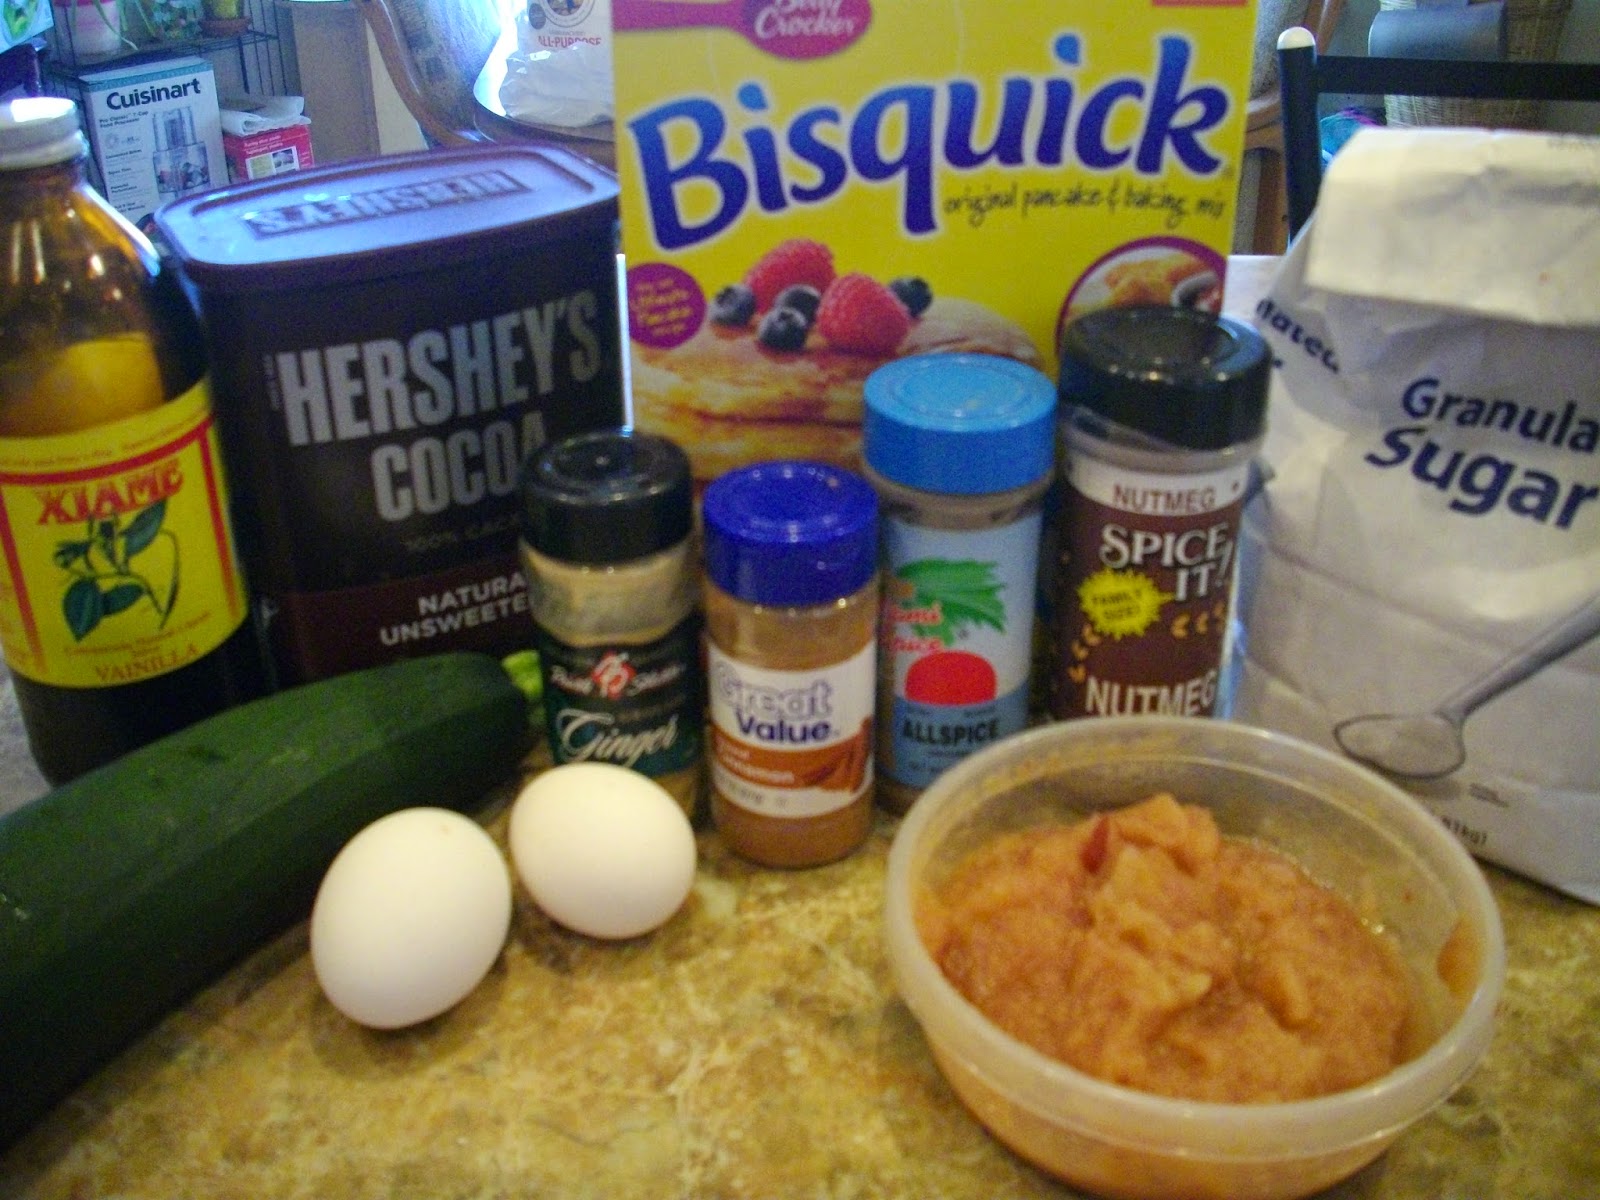
You will need:
2 cups all purpose flour
2 teas baking soda
1 teas baking powder
1 1/2 teas cinnamon
1 teas grated nutmeg
1 teas allspice
1/4 teas ground cloves
1 cup raisins
1 cup chopped nuts
1 stick butter  (1/2 cup)
1 large egg, room temperature
2 teas vanilla extract
2 cups applesauce
1 tabs confectioner's sugar
Preheat your oven to 350 degrees

Spray a 9 X 9 inch pan with baking spray, then sprinkle lightly with granulated sugar around the inside of the baking pan.   (Note:  I prefer using sugar instead of flour for this cake, but if you want to use flour you can.)
 In a medium bowl, combine together the flour, baking soda, baking power, cinnamon, nutmeg, allspice, and cloves.  Whisk together.
In a large bowl, cream together the butter and sugar until light and fluffy.

NOTE:  Make sure your butter is softened, so it will cream easier.
On low speed, beat in the egg.
 Now slowly add 1/3 of the flour mixture.
 Next add in 1 cup of the applesauce.
Add in another 1/3 of the flour mixture.
Add in the remaining applesauce.
 Add the balance of the flour mixture.
Lastly add in the vanilla extract.
Now stir in the nuts and raisins.

Note:  you can use walnuts, pecans, or whatever type of nuts you would like.
Turn the batter into the greased baking pan.

Bake for approximately 45 - 60 minutes, until the cake is cooked.
When a toothpick inserted into the center of the cake is removed, it should remain clean - your cake is now done.

Cool on a baking rack.
Once the cake is cooled, sprinkle 1 Tablespoon of confectioner's sugar into a sieve and sprinkle over the top of the cake.
NOTE:  this is an optional topping, but I think it adds a nice touch.
 Notice how nice an moist and fluffy the cake is.
 The cake is a nice dessert, or an anytime snack.
The nuts and raisins are scatter throughout nicely.

I have even chopped up apples and thrown them into the cake for a special treat.  You can change up this cake in so many different way.  These old recipes are so versatile, and still as good today as they were 50 years ago when my grandmother made them for me as a child.

Enjoy!

Monday, September 8, 2014

Chocolate and Spice and Everything Nice Cake

So your still trying to use up the zucchini, and you don't want to spend all day in the kitchen measuring all the flour, salt, baking soda, so on and so on...  Well I have developed just the cake for your family.  We had a Bisquick cook off at our 2014 State Fair this year and this was my original entry, (due to legal reasons, I had to wait until after the judging to publish it).  It's quite delicious, not at all heavy, moist, and you don't need to drag out the mixer. (One note:  due to the nature of Bisquick's dryness, you will want to cover the cake with plastic, so the zucchini can keep the cake moist).

Preheat oven 350 degrees.    Coat an 8” X 8” X 2 ” baking dish with cooking spray.

Ingredients for cake:
2 cups Bisquick
¾ cup sugar
½ cup applesauce
2 large eggs
1 teaspoon vanilla
½ teaspoon cinnamon
¼ teaspoon allspice
¼ teaspoon nutmeg
¼ teaspoon ground ginger
1 cup shredded zucchini
3 ½ Tablespoons cocoa
Grate your zucchini
Beat your eggs, (note - if you only have medium eggs you can use 3 medium eggs).
 Measure the Bisquick into a large bowl, using a fork, break up any large pieces.
Measure in the sugar, applesauce, eggs, vanilla, cinnamon, allspice, nutmeg, and ginger.
Mix in well
Measure in the zucchini and cocoa
 Stir in well.  Pour into the baking dish.
Ingredients for cake topping:
¼ cup chopped pecans
¼ cup butterscotch chips
¼ cup brown sugar

NOTE:  You could change the butterscotch chips for chocolate chips and the pecans for walnuts or whatever your family likes, (my husbands loves pecans and butterscotch - so I use them).
In a small bowl mix topping items together.


Sprinkle over top of cake batter.  Bake 45 minutes until toothpick comes out clean.  Cool on wire rack.
And there you have a quick, easy, deliciously moist cake.  And your family won't know it's a little more healthier than other chocolate cakes.  I find it's better to make it the day before I'm going to serve it, (keep it covered, so that it gets very moist), then all the flavors are fully developed and melted together.  This also freezes well.  We cut it into serving sizes, wrap each piece in plastic wrap and place all the pieces in a freezer bag.  Then when we want a piece of cake to carry in our lunch, we just grab one for the lunch bag.  By lunchtime, it's thawed out and ready to eat.
ENJOY!!