Making good food at home without breaking your budget

Monday, February 29, 2016

Blueberry Pudding Cake

My husband absolutely LOVES anything blueberry flavored.  So, whenever blueberries are on sale, I always stock up and keep them in the freezer.  Then I can add them to yogurt, muffins, pies, and cakes.  One of his favorite cakes is my homemade blueberry pudding cake.  It's so simple, comes together fast, and is so delicious.
First preheat your oven to 350 degrees
You will need:
2 cups blueberries, (fresh or frozen)
1 teas lemon juice
1 teas. ground cinnamon
1 teas. ground nutmeg
1 cup all- purpose flour
1 1/2 cup sugar
1 teas. baking powder
1/2 cup milk
3 Tab. butter, melted
1 Tab. cornstarch
1 cup boiling water
Spray a 9 X 9 baking dish with baking spray.
In a bowl, toss the blueberries with cinnamon, nutmeg, and lemon juice, make sure to coat the berries well.  Transfer the berries to the baking pan.
I use the same bowl that I coated the berries in, (less clean up).  Combine the following: 3/4 cup of sugar, 1 teaspoon baking powder, 1 cup all-purpose flour.  Stir to incorporate.
Add in 1/2 cup milk, 3 Tablespoons melted butter, and 1 cup boiling water.  Stir well.
Pour over the blueberries.
Combine 3/4 cup of sugar and 1 Tablespoon of cornstarch, stir well to incorporate the cornstarch into the sugar.
 Sprinkle the sugar/cornstarch mixture over the blueberries.  Gently stir into the batter mixture.  Bake in 350 degree oven for 45 - 50 minutes, until the cake test done.
It's been 50 minutes, and here is my cake.  A few of the blueberries are on the top, but most are dispersed under the cake batter.  Let cool on a wire rack, (about 30 minutes).  I cut my cake into 9 pieces.
As you can see the cake looks like it has blueberry pudding under the cake batter.
The blueberries are still whole, yet are suspended in a nice pudding like texture.  The next day the pudding will set up and be more like a jelly consistency.

My husband like to eat his cake still warm, with a scoop of ice cream on top.  I'm a purist, just give me the cake on a plate, plain please.

Give this cake a try as a simple after dinner dessert for your family.

Enjoy !

Monday, February 22, 2016

Cauliflower Frittata


 Cauliflower has been selling rather inexpensive lately, (between 49 cents and 69 cents a pound).  So we've been enjoying it many ways, (i.e.: steamed, baked, served mashed in place of mashed potatoes, as a rice substitute in stir fry, served as a pizza crust, etc.).  Recently I tried making a frittata (not the egg kind, but the Spanish kind - made with potatoes), but using cauliflower instead of potatoes.  Cauliflower is a great substitute for starchy vegetables.  And this recipe is easy and will feed 4 people.
You will need:
2 cups of cauliflower florets
1 egg
1/4 cup green onions
1/2 of red pepper
2 Tab fresh dill
1/2 tsp. cumin
1 tsp. Italian seasoning
1/2 tsp. onion powder
1/2 tsp. garlic powder
1/2 cup bread crumbs
2 Tabs. grated Parmesan cheese
1/2 cup shredded Italian blend cheese
1 tsp. olive oil
Clean and remove the cauliflower florets.
Steam the cauliflower.  I cook mine in the microwave, but you can do it on the stove top if you wish.  Just make sure to completely drain all the water from the cauliflower.

While the cauliflower is steaming, chop the green onion, red pepper, and remove the dill leaves from the stems, (discard the stem).

Add the steamed cauliflower, the chopped vegetables, and the egg to a food processor.
Blend for about 30 seconds until chopped and blended.
Transfer to a medium bowl, add the Italian seasoning, onion powder, garlic power, and cumin.
Add the Parmesan cheese and the Italian style blended cheese.

Note:  Italian style blended cheese is a mix of Mozzarella, white cheddar, Provolone, and Asiago cheeses.  But you can also just use Mozzarella.
 Add the bread crumbs.  Stir everything, until incorporated.
 In an oven safe skillet, over medium heat, add the olive oil.
Add the cauliflower mixture to the pan and cook for 10 minutes.  Do not stir.  While the cauliflower mixture is cooking, turn on the broiler.
After about 10 minutes, transfer the pan to under the broiler and cook for another 10 minutes. until the top is golden brown.
Remove from the broiler, and allow to cool.  Slice and serve.
Once the frittata has cooled, it holds it's shape.  You will notice it has a nice golden color.
The cumin gives it a nice smokey flavor and you would not guess it's cauliflower.  It's a nice substitute for a starchy potato side dish.

Give this a try for something new.


Enjoy !


Monday, February 15, 2016

Barb's Black Bean Veggie Burgers

Four years ago when my grandson began his vegetarian lifestyle, I knew that I needed to come up with alternative meals that he could enjoy with the rest of the family - especially when we had our family cookouts in the summer.  His mom would buy packaged frozen veggie burgers.  But one day he said, "Grandma, I bet you could make better veggie burgers".  So the challenge was on!  With some experimentation, I came up with my black bean veggie burger.  Our family all tasted them, and thought they we much better than the national chain's veggie burger.  Now, I noticed that a local fast food chain has started selling black bean burgers, at $4.50 EACH !  My recipe makes 5 good sized burgers for about $1.00 total.
You will need:
1 (16 oz) can black beans
1/2 medium green pepper
1/2 medium red pepper
1/2 medium onion
1 medium carrot
3 cloves garlic
1 egg
1 Tab. chili powder
1 Tab. cumin
1 teas. hot sauce
1/2 cup bread crumbs
Drain and rinse the black beans
Chop the red pepper and green pepper into 1 inch pieces.
Chop the carrot into 1/2 inch pieces
Slice the onion into wedges
Peel the cloves of garlic
Toss all the vegetables into a food processor
Process for a couple of seconds, until finely chopped.
In a small bowl beat 1 egg.
Add the chili powder, cumin, and hot sauce.

Note:  You can use any type of hot sauce you want. Don't worry, the patties won't be hot.

Mix together well.
In a medium bowl, add the beans.  Mash the beans.
Add the chopped vegetables, and stir into the mashed beans.
Add the egg mixture, and stir into the bean and vegetable mixture.
Add the bread crumbs.  Mix into the bean mixture.
Form the bean mixture into hamburger sized patties.
Place the patties on a sheet pan, lined with parchment, (or wax paper).  Place into the freezer for 20 - 30 minutes to set up the patties.

If you are going to bake you patties, preheat the oven to 375 degrees, and lightly oil a baking sheet that has been lined with foil.

If you are going to grill your patties on an outdoor grill, preheat the grill to high heat, and lightly oil a sheet of foil.
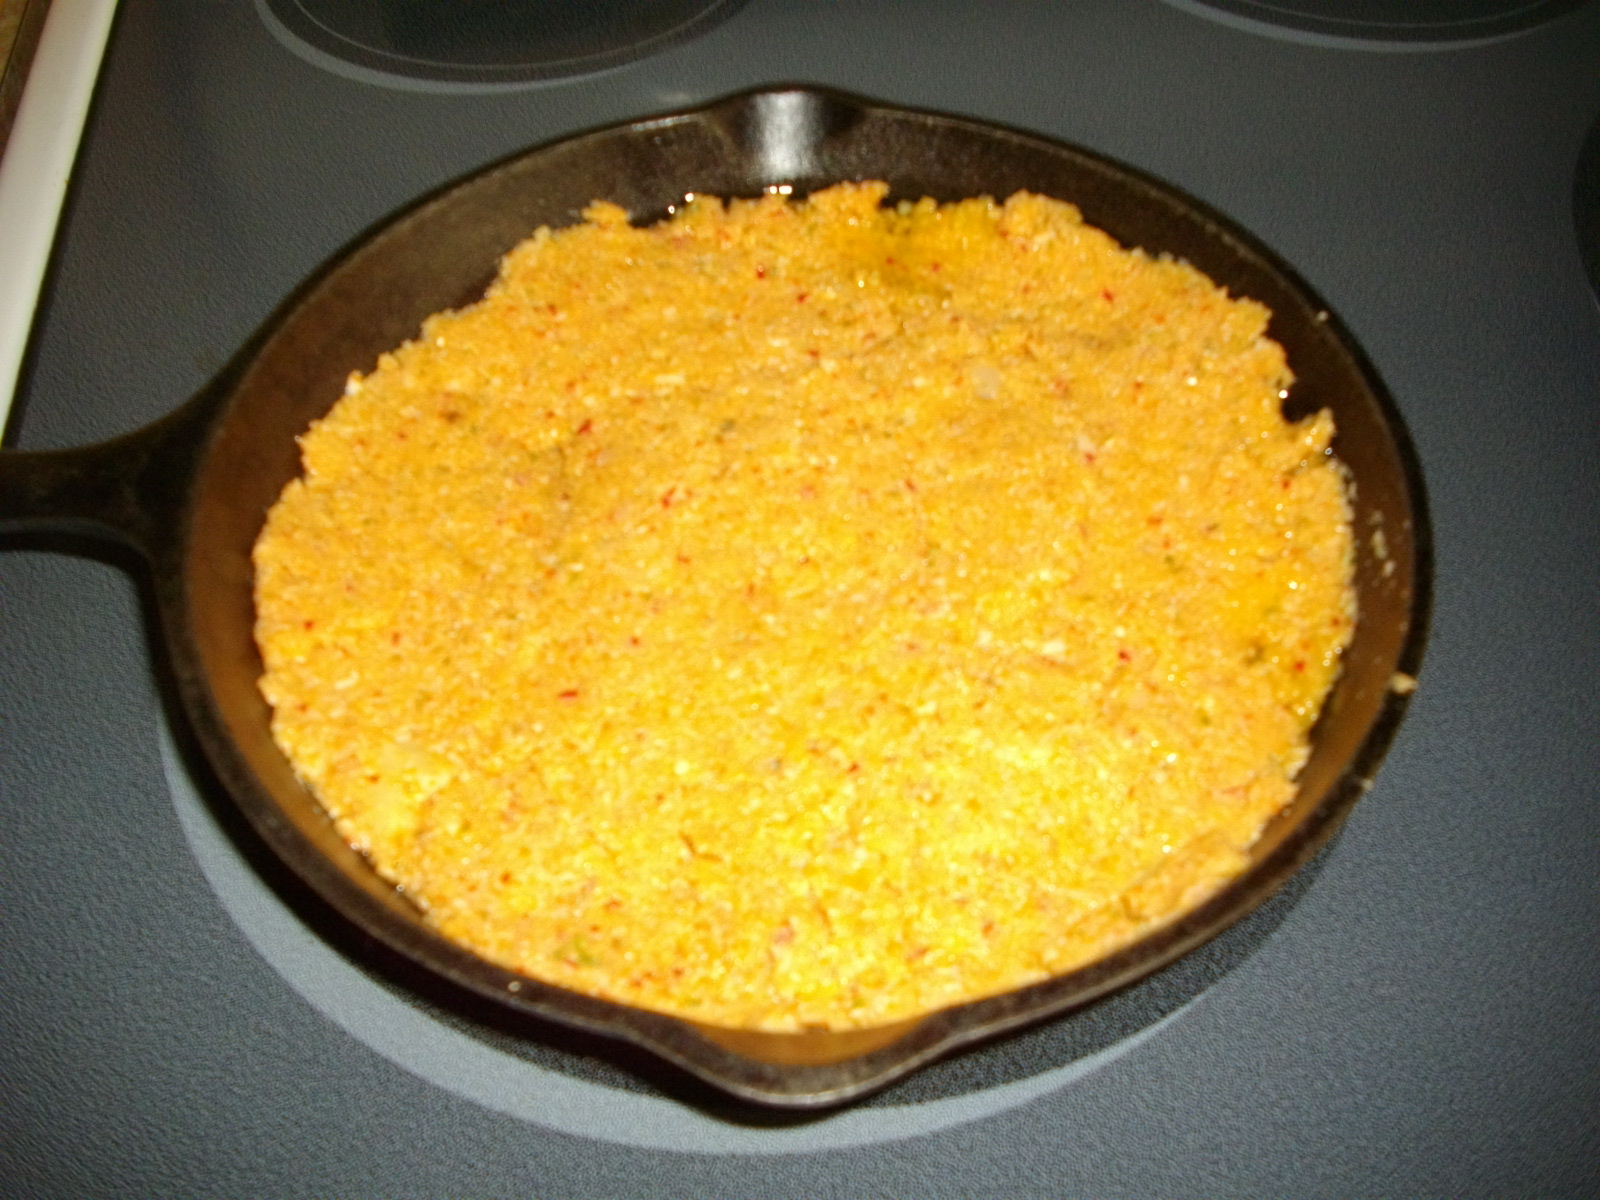
If you are pan frying your patties, on medium high heat add 1 teaspoon of oil to a pan.  When the oil is hot, add the patty,  Cook for 3 -4 minutes, until brown then flip over.
 As you can see, the patty has a nice golden brown color, and it doesn't absorb the oil that it cooks in.  Continue cooking on the second side for 3 - 4 minutes until the second side is nicely brown.

While the patty is cooking, start assembling your bun and condiments.
Before I put my patty on a bun, I wanted to show you the inside.  See how nice and colorful the inside of the patty is with the carrot, red and green pepper.  And the hot sauce doesn't give any heat to the patty.  But the cumin gives the patty a nice smokey flavor.
I like to add a slice of cheese, tomato, lettuce, mustard, and ketchup on a whole wheat bun.

Now that's a patty that makes a great lunch !

Give this black bean burger a try.  It's a great alternative to those store bought frozen kind.  And at 20 cents apiece, it's a real money saver compared to the fast food joints.


Now, if you want to keep your patties on hand in the freezer - layer squares of parchment paper, (or wax paper) between the patties.  Place the patties in a freezer zip lock bag.  Remove all the excess air, and place in the freezer.  Then whenever you want a quick black bean burger, just grab one from the freezer, cook it up, and enjoy.

I like to keep them on hand for a quick weekday lunch.

Enjoy!

Monday, February 8, 2016

Black Bean Brownies

If you're trying to avoid flour and refined sugars, but still need a dessert every now and then - this is one that you won't feel bad about having.  My husband has been avoiding both of these for the last 8 months and he's managed to drop 35 pounds.  When I made the first batch of black bean brownies, he was surprised at how close they came to tasting like the real thing.  He said they reminded him of the Passover cakes his mom would make when he was growing up.  This recipe will make 12 brownies.  It's so easy, and comes together very quickly.
First preheat your oven to 350 degrees:  Spray a 9 X 9 inch baking pan with non stick baking spray.
You will need:
2 cans of black beans
2/3 cup cocoa powder
4 large eggs
1 1/3 cup honey (or equivalent of sugar substitute)
2/3 cup coconut oil
1 tsp baking powder
1 tsp cinnamon
1 tsp nutmeg
1 tsp salt
1 tsp vanilla extract
pinch salt
Drain and rinse the 2 cans of black beans.
Place the black beans into a food processor.
Blend for a couple of minutes until smooth.
Add the rest of the ingredients.

Note:  I am using a Xylotol sugar substitute rather than honey, but either one will work.
Blend until very smooth.  The mixture will be very thick.
Pour into the greased baking pan.

Note: it you want some extra chocolaty flavor, you can stir in some chocolate chips at this point.  But you will be adding in sugar.


Smooth the mixture in the pan.

Bake at 350 degrees for 30 - 35 minutes.
 It has been 33 minutes, and this is what the brownies look like.

Remove from the oven and let cool completely.
My husband likes to have his with a glass of icy cold milk.
You can see, the brownie has a nice fudge-like interior, yet it is cooked completely through.  There are  not a lot of crumbs on the plate.

It's a typical flour-less cake type consistency.  And since you are not using sugar or oils, (only healthy coconut oil), you don't have to feel guilty about eating a piece of brownie.

Give it a try.

Enjoy !