Making good food at home without breaking your budget

Monday, July 27, 2015

Zucchini Carrot Bread

It's that time of year when zucchini is starting to spring up in everyone's garden.  Last year I shared my Chocolate Zucchini bread, (which also won 3rd place at the State Fair in bread competition baking).  Now here is my zucchini carrot bread, which is another favorite of mine, and I hope you'll enjoy it also.  The slight hint of orange, anise, and cardamon blend so well, that everyone will be asking "what's that wonderful taste?"

Preheat your oven to 350 degrees.  Line a 9" X 5" bread pan with parchment paper and very lightly butter the parchment paper, (note:  I use the leftover butter wrappers to butter the parchment paper - it has just enough for the job.  You can also use baking spray).

You will need:
2 1/2 cups all purpose flour
2 1/2 teas baking powder
1 teas kosher salt
1/4 teas ground cinnamon
1/4 teas anise seeds
1/8 teas ground cardamom
1 medium zucchini
2 medium carrots
3 eggs
1 1/2 cups sugar
3/4 cup unsalted butter, melted
1 Tabs orange peel
1 Tabs orange juice
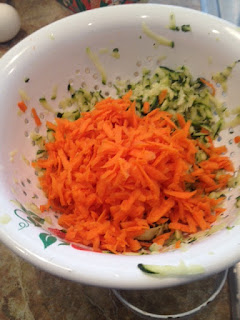
Grate the zucchini, then transfer to a colander and squeeze out the excess water.  You want your zucchini to be very dry. ( You can also wrap your zucchini in a cotton towel to wring out the excess water.)
Grate the carrots. the zucchini and carrots should total 2 1/2 cups.
In a medium bowl, combine the flour, baking powder, salt, cinnamon, anise seeds, and cardamom.  Whisk together all ingredients.


Note:  Since I don't use a lot of anise seed and cardamom, I purchase just a small amount from the bulk food sections.  That way I don't have a jar setting on the shelf going stale and than I have to throw out old spices.  I just buy a small amount as I need it to use.
In a large bowl, whisk the eggs.
Stir in the sugar.
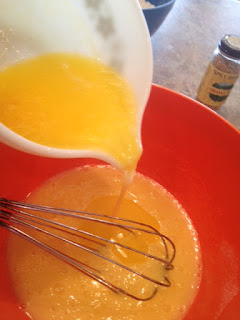
Stir in the melted butter.

Note:  Sometimes I substitute unsweetened applesauce, (that I make from apples that are starting to get a little past their prime), for the butter, this cuts down on the calories and fat, as well as adding another layer of flavor to the bread - yummy !!
Stir in the zucchini and carrots.


 Stir in the orange peel.


Note:  If you have a fresh orange on hand, then by all means zest the orange and use the peel,  The flavor will be more intense and much better.  Today I didn't have one, so I just used dried orange peel.
Stir in the orange juice.


Note:  Again, if you have a fresh orange, after you have removed the zest, then squeeze the juice and add it.   Fresh is always best.
Stir in the flour/spice mixture.
Now you will need your parchment lined bread pan.
 Pour the batter into the bread pan.


You can already smell the wonderful anise scent and the warm scent from the cinnamon and cardamon.  It smells so good!


 Spread the batter to the corners, and level it out.

Bake at 350 degrees for 1 hour, until a toothpick inserted in the center comes out clean.


After the bread is baked, remove from the pan and allow to cool on a baking rack.

If you want an extra layer of flavor, you can mix up a quick orange glaze, (orange juice and confectioner's sugar), and just before removing the bread from the pan drizzle the glaze over the slightly warm bread - oh so yummy!!

Notice how festive the bread is with the orange and green flecks from the carrots and zucchini?  And it is a nice golden buttery yellow and very flaky inside.  And the smell is so inviting.
And it taste wonderful.

I hope you enjoy this bread as much as my family does.

This makes wonderful snack size loafs, (for neighbor gifts), and muffin sizes, (just bake at 325 degrees for about 30 minutes).  Great for breakfast, snack time, anytime.

Enjoy.

And don't forget to go back and try my chocolate zucchini bread, and my chocolate and spice and everything nice cake.

Great ways to use your excess zucchini, along with my other zucchini recipes.

Enjoy !

Monday, July 20, 2015

Chicken and Pepper Quesadillas

When it's hot, (and you don't want to heat up the kitchen), or you're pressed for time, (and everyone wants something to eat quickly), but you look in the refrigerator and realize that you don't have enough leftover chicken to feed 4 people, let alone 6 - then here's a quick and easy way to turn just a few ingredients into enough food for everyone.  And the best part is you can easily adapt this recipe for one person, two, four, six, or how many you need.  These directions will easily feed 6 people.

You will need:
1 medium Anaheim pepper
1/2 cup shredded Mexican style cheese
1 cup shredded cooked chicken
1 medium tomato
1 green onion
1 small handful of fresh cilantro
6 8-inch flour tortillas
butter
salt
Seed and finely chop the Anaheim pepper.

NOTE:  if you want, you can substitute one 4 ounce can of diced green chili peppers, (drained).  But fresh is better, as it adds more flavor.  Don't worry about heat, there will be no heat, since you are removing all the seeds, and also Anaheim peppers are very low on the heat scale.
Finely chop the green onion
Chop the tomato,  (if you want to also seed the tomato, that's fine).
Shred the chicken into small pieces.
Chop, or snip the cilantro into small pieces.

Note:  if you don't have, or don't like cilantro - you can substitute fresh oregano, fresh parsley, or even fresh basil.
 On one side only, very lightly butter the tortillas.
Very lightly sprinkle salt on the buttered side of the tortilla, (trust me - this really adds to the flavor of any quesadilla you make !).

Note:  I use fine sea salt, but you can also use regular salt.
On a griddle, (or in a large skillet), over medium heat - place the tortilla, buttered side down.
 Add a sprinkling of chicken on 1/2 of the tortilla.
Add a sprinkling of onion on top of the chicken.
Add a sprinkling of pepper on top
Add a sprinkling of cheese
Add a couple pieces of tomato and a sprinkling of cilantro.
Fold the top of the tortilla over the filling, and very gently press down.
 You will be able to cook 2 quesadillas together in the pan.
After 3 or 4 minutes, when the outside of the tortilla has lightly browned, flip the tortilla over, and cook another 3 or 4 minutes until the second side browns.  Then remove from skillet.  Repeat with remaining quesadillas.


If you are preparing a large number of quesadillas, place them on a baking sheet and keep them warm in the oven, preheated to 300 degrees, until all the quesadillas are done.
Cut the quesadilla in half.

I like to serve mine with a little salsa and sour cream.  Sometimes I will make some homemade guacamole to go with them.
And just that quick you have delicious chicken and pepper quesadillas.

If you want to make a meal, just add some homemade Spanish rice and some homemade refried beans.

You can add and delete items, to customize these to your family's taste.  So the next time, you want something quick, make up a quesadilla.

Enjoy !

Monday, July 13, 2015

Homemade Refried Beans

Last post, I showed how I make a quick and easy Spanish Rice.  Now, I'll show you how I make my refried beans.
 Like most people, I used to buy my refried beans from the grocer, paying anywhere from $1 to $1.25 a can, (sometimes during the case lot sales, I could get them for as low as 69 cents a can).  But, when you're using one or two cans a week, that can add up to a lot of money over time.  During one meal, my husband asked, "why aren't you making your own refried beans?".  I got to thinking about it.  I knew how to make pinto bean soup, so it couldn't be much more involved.  So, with some trial and error, here is the easiest version of refried beans you will find.  And when you consider that a pound of dried pinto beans only cost around 80 cents to $1, and you get the equivalent of 3 cans - that a major savings!!
You will need:
Dried pinto beans
onion
jalapeno pepper
garlic
salt
black pepper
cumin
water
The best part of this recipe, is that you cook it in a slow cooker.  No standing over the beans all day,  And NO pre-soaking needed.
 First measure out 2 cups of pinto beans, (note: a one pound bag contains approximately 2 1/2 cups of beans, so you will have some left over for another recipe).  Sort through the beans, and make sure there are no little stones, (I have very rarely found any, but you never know when one has slipped into the bag - so it is best to check).
Next, I like to give my beans a quick rinse, (just to make sure any dirt that might still be one them gets washed off).
Peel 1 medium onion and cut in half.

Seed and remove the ribs from 1 jalapeno pepper, then finely chop.  (don't worry about the beans having any heat - there will be NO heat).

Finely chop 2  cloves of garlic.
Add the beans, onion, pepper, and garlic to the slow cooker.

Now add 3/4 teaspoon of salt.
 Add 1/2 teaspoon of black pepper.
Add 1/4 teaspoon of cumin.
Add 6 cups of water.
Give everything a good stir.  Cover the slow cooker, turn on high and let the beans cook for 8 hours.

This is a good recipe to do overnight, or while you are at work.  Just start it and forget it.
OK - it's been 8 hours - and see how the beans are nice and plump!  At this point you would have a delicious bean soup.

If you wanted your beans to have some heat, now is when you would add some red pepper flakes or another chopped jalapeno pepper (I don't, I leave that out). You can season to taste with more salt.
Remove the onion and discard.
Pour off the excess liquid.  Notice that there is only 2 cups left!  The beans have absorbed the other 4 cups of water.   Don't throw this down the sink just yet.  You may need to add a tiny bit back into the beans (if they are too dry).
 Now using a potato masher, mash the beans.
And just like that you have made refried beans !!
I like to top mine with a little Mexican style cheese.

A bean and cheese burrito - yummy!
Beans and rice - super easy.

And they taste just like what you would buy at the store.

And the best part - there's NO fat in the homemade version, and it was only 1/3 the cost of store bought, (makes it taste even better!).

Leftovers store well in the refrigerator, covered.

I put my leftovers in a plastic zipper bag, (labeled with the date).  Then when I want quick refried beans, I just defrost, while my Spanish rice is cooking.

Enjoy!