Making good food at home without breaking your budget

Saturday, July 14, 2018

Date Nut Bread


Dates are in season, and the prices have dropped for a short time.  See all the different varieties available on the shelves reminded me of all the date inspired treats, during our visit to the Middle East last year.  One of my favorite was the Date Breads.  With some trial and error, I finally have a bread that our family enjoys.  Let me show you how easy it is to make.
 You will need:
8 ounces of dried pitted dates
1 large orange
1/2 teas. baking soda
1/8 teas. salt
1 cup boiling water
2 cups all purpose flour
1/2 cup firmly packed brown sugar
1 1/2 teas. baking powder
1/4 teas salt
1/2 teas ground cinnamon
1/2 cup cold unsalted butter
1 large egg, room temperature
1 teas. vanilla extract
1/2 cup pecans or walnuts
1 teas sugar

First, coarsely chop the dates.  Make sure to remove all the seeds.  You should have about 1 1/2 cups of firmly packed chopped dates.


Grate the orange peel, (you will need 2 tablespoons).  And juice the orange, (you will need 1/4 cup of juice).

Add enough boiling water to the juice to make 1 cup.
In a small bowl, add the boiling orange juice/water, baking soda, and 1/8 teaspoon of salt.  Add the chopped dates.  Stir well, then set aside and allow to cool.


 Preheat the oven to 350 degrees.  While the orange juice/water is cooling, spread the pecans, (or whatever type of nut you prefer to use), on a baking sheet.  Roast the nuts for about 5 minutes, until they start to brown, and you just start to smell the nuts.
Notice how the nuts have darkened in color.  Be sure to watch the nuts, they will go from roasted to burnt in just seconds.  Remove from oven and allow to cool.
In a food processor, add the flour, brown sugar, baking powder, 1/4 teaspoon salt, cinnamon, and orange peel.  Process just enough to combine.
Add the cold butter, and process until the mixture resembles coarse breadcrumbs.
This is what the flour mixture will look like.  Add the flour mixture to a large bowl.


Coarsely chop the nuts, and stir into the flour mixture.
 In a small bowl, add the egg and vanilla extract.  Whisk the egg and vanilla together.
Add to the flour mixture. 
 Add in the dates and ALL of the orange juice/water.
 Stir just until the mixture is combined.

Spray a bread loaf pan.  Add a piece of parchment paper to the bottom of the pan and spray the top of the parchment paper, (this will ensure the bread removes easily from the pan).
Spoon the bread dough into the bread loaf pan.
 Spread out and level the bread dough.
Lightly sprinkle 1 teaspoon of sugar over the top of the bread dough.

Bake in the preheated 350 degree oven for 60 to 65 minutes, (until a toothpick inserted in the center comes out clean, and the bread is golden brown).
Allow the bread to cool on a baking rack for about 10 to 15 minutes.
Remove the bread from the pan, and gently peel off the parchment paper.  Turn the bread upright and allow to cool completely.
Your bread is now ready to eat.

However, if you can resist the temptation and let your bread sit for 1 day, the flavors develop even more, and it's much more tasty.
Notice how nicely the dates and the nuts are suspended in the dough, and the bread has a nice crumb.
You can taste the slight orange flavor, the warm roasted nut flavor, and the warmth of the cinnamon against the dates, (which also have a delicious orange undertone).  It's so good!

And another way to serve the bread it with a small amount of honey on the slices - Oh my goodness, so good.

So go get some dates, while they are still in season and reasonable priced and try a loaf of date nut bread.

Enjoy !

Friday, July 6, 2018

Corn Fritters


The corn is starting to go on sale in our part of the country, (you can find it 5 or 6 ears for $1).  And who doesn't love fresh corn on the cob?  But sometimes you might cook too much, or maybe you just have a couple of ears leftover.  That's the time to make corn fritters.  This simple age old recipe makes 8 good sized fritters, with very few pantry ingredients.  Let me show you how.
You will need:
2 cups of corn off the cob, (about 2 ears)
3/4 cup flour
2 Tabs. cornmeal
1 Tabs. sugar
1 1/2 teas. baking powder
1/2 cup milk
1/4 teas. cayenne pepper
1 egg
oil for frying
salt and pepper
Remove the corn from the cob.
2 ears will give you approximately 2 cups of corn.

Note:  you can also substitute frozen corn that has been thawed, or even canned corn that has been drained of all the liquid.   Also, your corn doesn't need to be cooked before you remove it from the cob.  You can use it raw or cooked on the cob.
In a medium bowl, whisk together the flour, cornmeal, sugar, baking powder, and cayenne pepper.
Add the egg to the milk, and stir well to break up the egg and mix it into the milk.
Add the milk to the flour mixture, and fold in.
Add the corn, and gently fold in.
In a medium pan, heat 2 or 3 inches of oil.

Add the fritter batter, approximately 2 heaping tablespoons per fritter.  The batter will puff up and form a nice fritter.
Let fry about 2 or 3 minutes per side, until golden brown, flip over and fry an additional 2 or 3 minutes.

Remove from the oil, and transfer to paper towel to drain while you cook the remaining fritters.
Season with salt and pepper to taste.  And your corn fritters are ready to serve.
These are a great side dish.  Down south this is a common dinner dish, (families could feed large groups with very little corn).
 When you break it open, you see the corn and the nice fluffy interior.  It's crunchy on the outside, yet warm, soft, and has nice layers inside.  It's just begging for you to bite into it.
If you want to really "gild the lilly", just add a little honey to the fritter.  O-M-G !!  So good.  Even plain they are delicious.  So, got a couple ears of corn on hand?  Give this fritter recipe a try.

Enjoy !

Monday, May 14, 2018

Chocolate Cinnamon Cake (Quick and Easy)

There are times when you want a quick dessert, but not a large amount.  Maybe just enough for 2, 4, or even 6 people.  This is one of our favorites.  It's just enough for a small family, especially when there are only 2 or 4.  It comes together quick, and you probably have the ingredients in your pantry.

You will need:
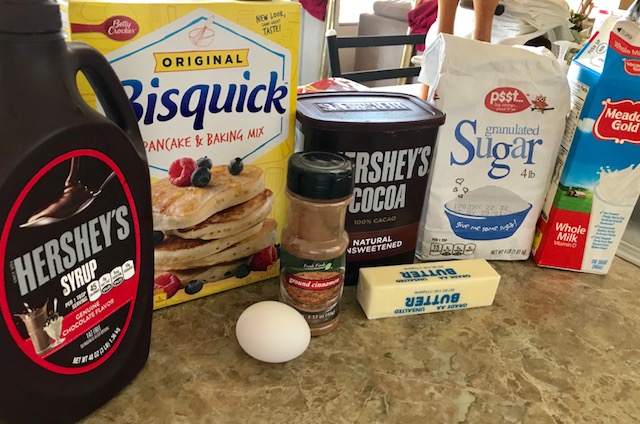
2/3 cup baking mix, (such as Bisquick or Jiffy)
1/4 cup sugar
2 Tabs. cocoa
3/4 teaspoon cinnamon
1 egg
1/3 cup milk
1 1/2 Tabs. softened butter
1/2 cup chocolate flavored syrup
Preheat the oven to 350 degrees.

In a small / medium bowl, combine baking mix, sugar, cocoa, and 1/2 teas cinnamon.  Whisk together to remove any lumps in the baking mix and cocoa.
Add in milk, egg, and softened butter.  With a hand mixer on low, mix for 30 seconds, then with the hand mixer on medium mix for 3 minutes.  Be sure to scrape the bowl often.
Pour into an 8 X 4 inch loaf pan that has been sprayed with baking spray.  Bake at 350 degrees for 30 to 35 minutes, until a toothpick inserted in the center comes out clean.
Remove from oven, and allow to cool on a cooling rack for 10 minutes.
Gently remove cake from pan, and allow to cool.
While the cake is cooling, in a small microwaveable bowl combine the chocolate syrup and the remaining 1/4 teas. cinnamon.  Microwave on high for 1 minute.  Remove and stir.
Drizzle the topping over the top of the cake.
Your quick and easy chocolate cinnamon cake is now ready to serve.
The cinnamon adds a nice touch to the chocolate.  My husband likes to add a scoop of vanilla ice cream on top of his cake, which is also very delicious.

So, the next time, you're in a hurry to get a dessert for your dinner - give this chocolate cinnamon cake a try.

Enjoy !!

Tuesday, May 1, 2018

3 Bean Cassoulet

Last year during our 28 day cruise from Rome to Singapore, there were several days that I needed a break from the heavy meals,  So I would order from the vegetarian / vegan menu.  I had a 3 Bean Cassoulet that was so tasty and so filling, (it also gave my system a chance to relax from the heavy meals).  In fact, I had it several times on our cruise.  Since I've been home, I've tried several times to recreate the recipe, and I've finally think I've hit upon it.  It's great for those meatless Monday night meals, or even as a side dish.  This recipe has very few ingredients, yet makes a large pot.  You can easily feed 6 to 8 people as a main dish.  Let me show you how I make it.
You will need:
1 can (28 ounces) tomatoes
1 can (15 ounces) garbanzo beans
1 can (15 ounces) great northern beans
1 can (15 ounces) small white beans with garlic and onions
1 cup chopped carrots
1 cup chopped onions
2 garlic cloves, minced
1 bay leaf
2 teas. dried parsley flakes
1 teas dried basil
1/2 teas. salt
1/2 teas dried thyme
1/8 teas pepper
Preheat the oven to 350 degrees.
Drain and rinse the  garbanzo and great northern beans.
Drain but do not rinse the small white beans, (you don't want to remove the garlic and onions).

Add the 3 beans to a 3 quart baking dish.

Note:  You could also use chickpeas in place of the garbanzo beans.

Add your chopped carrots, onions, and minced garlic.

Make sure to chop your carrots and onions very small, (so they will cook completely through).  I used 1 large carrot and 1 medium onion.
Add the parsley flakes, dried basil, salt, dried thyme, and pepper.
Add the tomatoes, and bay leaf.


Note:  You can also use stewed tomatoes, to add another layer of flavor.
Stir everything to combine completely.

Cover and bake for about 90 minutes, (until the vegetables are cooked completely).
Once the vegetables are cooked completely, you will notice that tomatoes have formed a sauce and thicken slightly.  Let the cassoulet cook just slightly, before serving.
And you have a wonderful, tasty, meatless main dish.  Or, a great side dish.

And for those who have a meat lovers in the family, An alternative is to brown up some ground meat and add it to the cassoulet as you are assembling it, and bake it all together, (just remember to drain any excess fat from the meat, before adding it to the mixture).


Enjoy !

Sunday, April 22, 2018

Italian Bread (Soft loaf)

At our house, we like a loaf of soft Italian bread for different kinds of sandwiches, (especially when we have Italian beef sandwiches). It doesn't take long to make a loaf, it's so easy, and it takes so few ingredients. Let me show you how I make it.
You will need:
1 packet of yeast
1 tsp sugar
1 cup warm water (110 - 115 degrees)
2 1/2 cups bread flour, (or all purpose)
2 Tabs olive oil
1 tsp salt
 In a large bowl combine yeast, sugar, and warm water.  Let it sit for about 5 minutes, until it blooms, (becomes foamy).
 Add to the yeast olive oil, and salt, stir in.
Add in the flour, stirring in until completely incorporated.

I like to use bread flour, but you can use all purpose flour.
The dough will come together and become shaggy, (it will pull away from the sides of the bowl).  It will be slightly damp.   Turn out onto a lightly floured work surface and knead the dough for about 10 minutes.
You can add some more flour to the dough as you knead it so that it forms a smooth ball.  You will know your dough is ready when you press a finger into the dough and it springs back.  Place the dough in a lightly greased bowl, cover and allow it to rise until it doubles in size, (about 1 hour), in a warm place.
After 1 hour, this is what your dough will look like.
Place your dough on a work surface, and gently shape it into a 12-inch long batard, (torpedo).
 GENTLY transfer the dough to a parchment lined, (or lightly greased), baking sheet.  Cover the dough, and allow it to rise for 20 minutes.

Turn on the oven to 400 degrees, and allow the oven to preheat, and get nice and hot.
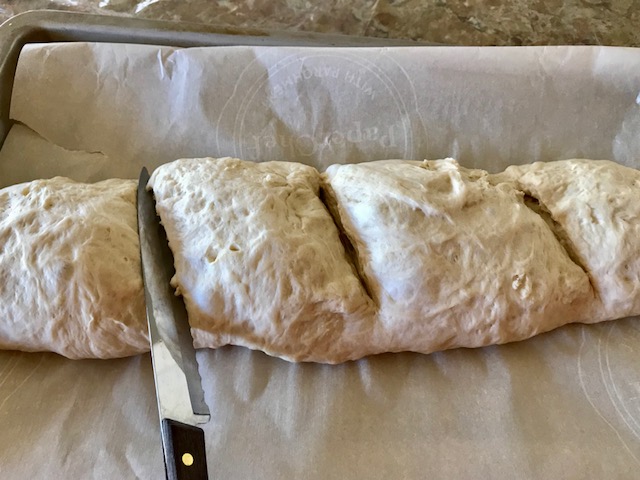
After 20 minutes, use a serrated knife and cut 3 or 4 quarter inch slits in the surface of the dough, (this allows the bread to bake evenly throughout).  Bake the dough for 20 minutes, checking it during the last couple of minutes.
You want your dough to be nice and brown.  I test my bread with an instant-read thermometer to make sure it reads 200 degrees internally when I pull it out of the oven.

Note:  if you would like a crispy exterior, you can spray the exterior of the bread lightly with water after it has been baking in the oven.
Allow the bread to cool completely before slicing.
Notice the nice texture of the bread.  And it tastes wonderful.

Sometimes when I want to add additional flavor inside the bread, I will add 1 teaspoon of Italian Seasoning to the dough when I add the flour.  It gives the bread another level of flavor.

This bread stores very well.
Tonight we are having Italian roast beef sandwiches.  This is just the bread for these sandwiches.  It soaks up the juices from the meat and carries the heartiness of the meat and peppers.

Try this bread at your house.

Enjoy!