Making good food at home without breaking your budget

Monday, March 12, 2018

Moist Tender Pork Loin Roast Dinner

This is a delicious and super tender pork roast dinner, and the best part is it's all done in ONE pot.  You almost don't need a knife to cut the meat.  It easily feeds 6 people with only a 2 or 2 1/2 pound pork loin roast.  You don't need to make the gravy, but I've included the gravy recipe, just in case you want to make it.  It's so easy.
You will need:
A 2 pound, (or 2 1/2 pound) pork loin roast
1 small onion
1 1/2 Tabs Italian seasoning
1/4 teas crushed red pepper flakes
1 can (14 1/2 ounces beef broth)
1/8 teas ground black pepper
2 teas salt
1 bay leaf
1 pound baby carrots
6 to 8 small potatoes
1 Tabs water
4 teas. cornstarch
Pre-heat the oven to 325 degrees.

Slice the onion, very thin
Wash and quarter the potatoes, (I like to use red potatoes, but you can use whatever you have on hand). 
In a small bowl mix together the Italian seasoning, red pepper flakes, ground black pepper, and salt.

Note:  If you want to stretch the meal to feed more people, just add a few more potatoes
Using a paper towel, dry off the pork loin.  Cut about 6 horizontal cuts down the center of the roast, and stuff each one with a slice of onion.  Reserve the rest for the pot.
 Place the roast in a dutch oven, and sprinkle the seasoning mixture over the roast.
Pour the beef broth around the roast.

I am using my homemade beef broth, but you can use store bought.
Place the remaining onions slices, the pound of baby carrots, the quartered potatoes, and the bay leaf around and over the roast.
Place the cover tightly on the dutch oven, and bake for about 2 1/2 hours.


Once the vegetables are tender, remove the meat and vegetables and meat to a serving platter.  Cover with foil to keep warm while you are making the gravy.

We like lots of carrots so we always use the full one pound of baby carrots, when we prepare this roast.
Now, it is time to make the thickening agent for the gravy.

In a small bowl, mix the water and the cornstarch, and blend until smooth.  Remove the meat and the vegetables to a serving platter.

 Bring the pan drippings back to a boil over medium heat, and reduce down to half, (about 10 to 12 minutes).  Add the cornstarch thicker, and blend in until smooth and the gravy begins to thicken, (about another 5 minutes).  Remove from heat and serve over meat.
And dinner is ready, without a lot of fuss.  Add a green salad and you have a complete balanced meal.  So yummy, and this will fill any tummy.

The key to stretching a little meat, it to add lots of vegetables with them.  Try this delicious pork loin recipe.

Monday, March 5, 2018

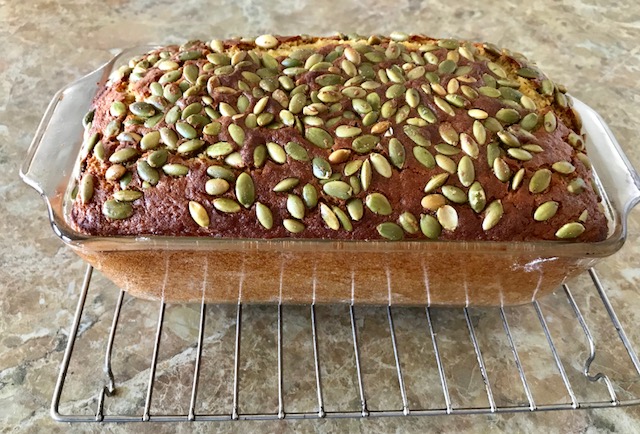
Pumpkin and Orange Bread

If you liked my pumpkin bread, you'll also like this pumpkin orange bread.  The addition of the orange peel and orange juice gives just the right amount of sweetness to counterbalance the saltiness of the addition of the pepitos for a pop in your mouth.  This recipe make one 9" X 5" loaf.
You will need:
1 stick (8 Tabs) of unsalted butter
2 cups all purpose flour
1 cup sugar
1 teas Kosher salt
2 teas baking powder
1/2 teas baking soda
1/4 teas grated nutmeg  1/4 teas allspice
1 1/4 cup pumpkin puree
3 large eggs
1 large size orange
1 teas vanilla extract
1/3 cup pepitos (Mexican pumpkin seeds)
Spray a 9' X 5" baking loaf pan with baking spray and then lightly flour.  Set aside.

In a large bowl, whisk together;
flour, sugar, salt, baking powder, baking soda, nutmeg and  allspice, (make sure to whisk until it is combined well).
Melt the butter.  Remove the zest from the orange, (You will need 2 teas. of orange zest).  Squeeze the juice from the orange, (you will need 1/4 cup of orange juice).
In a medium bowl, combine the butter, orange zest, orange juice, pumpkin puree, slightly beaten eggs, and vanilla.  Whisk until smooth.

Note:  I am using pumpkin puree from pumpkins grown in my garden.  If you use store bought, be sure you do not buy pumpkin pie mix.  Buy a 15 ounce can of pumpkin puree.  Also, let your eggs set out for 1/2 hour at room temperature before using.
Make a well in the center of the flour mixture.  Pour the pumpkin mixture in the center and stir together just until combined and no dry flour remains, (it is important not to over mix).
It is OK to have some lumps in the batter.
Turn on the over to 375 degrees.  Get your sprayed and floured pan.
Pour the batter into the pan and spread it evenly.  Top with the pepitos.  You can even press the seeds down into the batter to make sure they adhere.
Note: I usually buy my pepitos in the bulk section of the grocery store.

Bake for about 60 to 75 minutes, (depending on how hot your oven bakes), until a tester inserted into the center comes out clean.

Within 15 minutes, you begin to smell the orange and the pumpkin aromas in your kitchen - yum.
Transfer to a cooling rack to cool in the pan for at least 10 minutes.  Then remove from pan and let cool on the cooling rack.

This bread stores well at room temperature very well.  And the next day the flavors are even better.
If you look closely you can see the orange zest, and you can taste the orange and the very slight saltiness of the pepitos.  It is a wonderful change from the usual pumpkin bread.

Enjoy.

Monday, February 26, 2018

Granny's Sunday Meat Sauce and Noodles

When you come from a large family, (there were 7 children in our family, and 13 children in my mom's family), the meals need to be hearty enough to fill everyone and easy to adjust the quantity to stretch the portions to go around, yet still be tasty.  Grandma's Sunday meat sauce and noodles was a tasty meal that was served many times.  And it was easy to adjust the portions down for a small family or up for large families.  Let me show you how easy it is to make.  These measurements will feed 4 adults easily.
 You will need:
1 pound of ground beef
2 carrots, chopped
1 celery rib, chopped
1/2 medium onion, chopped
2 large garlic cloves, chopped
3 ounces of mushrooms, slices
1 Tab. olive oil, (if you are using lean meat)
1/2 cup whole milk
Kosher salt / black ground pepper
ground nutmeg / oregano / dried thyme
2 Tabs tomato paste
28 ounces of tomatoes
choice of pasta
 In a dutch oven, over medium heat, cook the ground beef.  Note:  if you are using a lean beef, (i.e.: 90/10, then add 1 Tab of olive oil to the pan).  Sprinkle Kosher salt and pepper over the ground beef.  Cook until no longer pink.
Drain off any fat from the beef.  Then, add 1 Tab of olive oil.
Note: if you had to add olive oil, don't worry about draining off the oil
Add the chopped carrots, onions, celery, mushrooms, and garlic.  Sprinkle with salt and pepper.   Cook for approximately 10 or 15 minutes until the carrots and onions have softened.
Add in the oregano, thyme, and nutmeg, and continue cooking for another 5 minutes.
Make a well in the center and add the tomato paste.  Cook and stir in the tomato paste for 5 minutes, (this removes the canned flavor from the tomato paste).
Drain any excess liquid from the tomatoes and using your hands, squish the tomatoes up, then add to the meat mixture.  Stir in the tomatoes.
Note:  I am using tomatoes from my garden, but if you are using canned tomatoes from the store you will want to add 1 Tabs of sugar at this point.
Cover the dutch over and continue cooking over medium-low heat for 1 hour, (making sure to stir every 15 minutes).
 You will notice the sauce had cooked down and is getting thicker.
After 1 hour, stir in the milk.  Continue cooking with the cover off the dutch oven for another 30 minutes.  Meanwhile start a large pot of salted water boiling for the noodles.  Decide what kind of noodle to cook.  You can use spaghetti, wide egg noodles, bow ties, penne, etc.  Tonight, I am using spaghetti.
Taste the meat sauce, for seasoning.  Does it need more salt or pepper.  Maybe a little more sugar?
 Pour the sauce into the serving family sized bowl, (or even leave it in the dutch oven).  Add the cooked noodles, and stir the noodles into the sauce.
Now your meat sauce and noodles are ready to serve.  Just add some grated cheese on top.
A slice of homemade bread, some grated cheese, and dinner is ready.

So yummy, and very filling.

You can make up a double batch of the sauce, and freeze half of it for use later - a real time saver.  And the leftovers for lunch taste even better.

Sunday, October 1, 2017

Apology for not posting lately

I know I haven't posted any recipes for sometime, and I apology.  I had knee surgery the first part of January, and what was supposed to be a couple weeks of recovery turned into months of recovery and a total of 4 surgeries and a pic line, (which required home health care for 7 weeks and physical therapy to learn how to walk and retain most of my range of motion).  Once I was released from PT, my dear husband took me on a wonderful 28 day cruise of the Mediterranean and Orient, (sailing from Rome to Singapore).  And as luck would have it, I returned home, to come down one week later with a new internal infection of my intestines, (called C-Diff).  Another 2 months of antibiotics and misery.  But I can happily report that I have now surpassed one month completely free of infections.  I am ready to get back to a semi normal life and sharing a few tips on cooking good, delicious food without breaking your budget.  It maybe slow to start, but I'm back.  So to those who have stuck with me, THANK YOU !  I really appreciate you all.  Now let's get cooking for our families.

Monday, January 9, 2017

Baked Honey Pears

Most people have sworn off desserts the first part of the year, in an attempt to drop a few of their holiday pounds.  But sometimes you still want a little something sweet.  Baked pears are just the treat.  And when you add some nuts, (for protein), and a little honey, (for sweetness), they are yummy.  Let me show you how easy, and quickly 2 pears can be transformed into a simple for delicious dessert for 4 people.
You will need:
2 large sized ripe pears
2 Tabs. honey
1/4 cup pecans, (or walnuts), chopped finely
1/3 teas. ground cinnamon
Preheat the oven to 350 degrees

Wash and slice the pears in half.  Then slice off a sliver from the bottom to create a level surface for the pears.
Turn the pears over, and scoop out the seeds and remove the stems.
 Place the pears on a baking sheet.  Add the walnuts in the scooped out center.
Sprinkle 1/2 teaspoon cinnamon over each pear.
Drizzle 1/2 teaspoon honey over each pear.
 Bake the pears for 30 minutes, until fork soft.  Allow to cool for a couple of minutes.
Your wonderfully sweet dessert is now ready.
Yummy.  You have the crunch of the nuts, the sweetness from the pear and the honey.  If you want to fancy up the pear, you can add a dollop of yogurt or whipped cream on top.  We like to eat our baked pears plain.  So good.  Reminds you of a baked apple.  And pears are usually plentiful this time of year.

Enjoy !

Monday, January 2, 2017

Cheesy Chicken Enchiladas

Sometimes you want a dish that's kid approved, easy, quick, and tasty.  If you have some leftover chicken - then this dish is the dish.  With a few ingredients, you can easily feed 6 to 8 people.

You will need:
1 can, (10.5 oz), cream of chicken soup
milk (1/2 of the empty can)
1 can, (4 oz), chilies, chopped
1/4 cup chopped black olives
2 cups shredded chicken
1 1/2 cup Mexican style, (or Jack blend) cheese
6 to 8 tortilla

 Preheat the oven to 350 degrees
Lightly spray coat a 9 X 9 inch baking dish with baking spray.

In a medium bowl, combine 1 cup of the cheese, the can of cream of chicken soup, and 1/2 of the can filled with milk.  Stir well to combine.  Sit aside, this will become your sauce.
In another bowl, combine the shredded chicken, chopped chilies, chopped onions, and remaining 1/2 cup of cheese.  Mix well to incorporate.
Spoon a generous amount of the chicken mixture onto a tortilla shell, (about 1 or 2 tablespoons).
Roll up the tortilla shell, making sure to tuck in the filling.
Place the rolled filled tortilla into the sprayed baking dish, seam side down.
Continue until all the mixture and tortillas are used up.  Depending on how much filling you place in the tortillas, you will get 6 to 8 enchiladas.
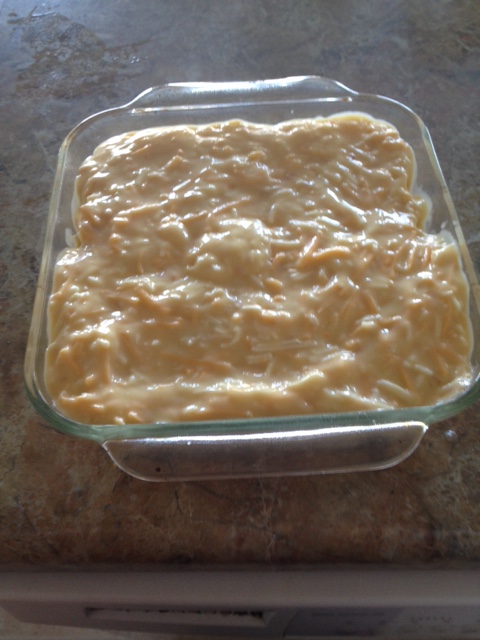
Pour the cheesy sauce over the rolled tortillas.
Smooth out, making sure all the tortillas are covered well.  Bake 15 to 20 minutes, until the cheese is melted and nice and sauce is nice and smooth.
 Remove from oven and allow to cool slightly before serving.
Garnish as desired.  Tonight I am serving my enchiladas with my homemade refried beans, and a dollop of sour cream and some cilantro.
Notice how wonderful cheesy the inside is, as well as the outside.  The kids as well as adults love this, and it's a good way to use up leftover chicken.

Enjoy !